Introduction
Hi friends, in this article we will learn how to use impersonation or elevated permission to read items from the SharePoint list in the SPFx web part. SPFx web parts are client-side web parts that run always in the current user’s context. This can pose a challenge when a web part needs to access data that the user does not have permission to view. Let us see how we can overcome this limitation in SPFx web parts.
Why we need to Elevate Permission
There are scenarios where the users will not have access to some of the information directly in the SharePoint UI but there is a need for them to validate and display a set of information from the same source. This is the best scenario of elevating the users permission to display the information.
Understanding Permission Constraints in SPFx
By default, SPFx executes in the user’s context, meaning it cannot access any SharePoint data beyond what the user has permission for. Unlike server-side solutions, SPFx does not have built-in support for elevated permissions. To access data beyond the current user’s permissions, you need an external mechanism and one of the ways is to use Azure Functions with App-Only Permissions.
Steps to Elevate Permissions in SFPx
Register an Azure Application in Entra ID
I had covered this registration process in many of my articles and you can refer any of the article to get a reference to it.
- Go to Azure Portal → Microsoft Entra ID → App Registrations → New Registration.
- Provide a name (e.g., SPFxElevatedPermissions).
- Choose “Accounts in this organizational directory only (Single tenant)”.
- Click Register.
- Navigate to API Permissions.
- Click Add a permission → Select Microsoft Graph or SharePoint.
- Choose Application Permissions (not Delegated Permissions).
- Add necessary permissions, e.g., Sites.Read.All.
- Click Grant admin consent.
Create an Azure Function
I hope you are aware of how to create an azure function using VS Code or Visual Studio. Here I had created an Azure Function using Javascript template and used the HttpTrigger
Below is the complete code of Index.js. Additionally, you need to install axios npm package.
const axios = require("axios");

module.exports = async function (context, req) {
    const tenantId = process.env.TENANT_ID;
    const clientId = process.env.CLIENT_ID;
    const clientSecret = process.env.CLIENT_SECRET;

    // Get Access Token
    const tokenUrl = `https://login.microsoftonline.com/${tenantId}/oauth2/v2.0/token`;
    const tokenData = qs.stringify({
        grant_type: "client_credentials",
        client_id: clientId,
        client_secret: clientSecret,
        scope: "https://graph.microsoft.com/.default"
    });

    try {
        const graphUrl = 'https://graph.microsoft.com/v1.0';
        const tokenResponse = await axios.post(tokenUrl, tokenData, {
            headers: { "Content-Type": "application/x-www-form-urlencoded" }
        });

        const accessToken = tokenResponse.data.access_token;

        // Get Site ID
        const s_graphUrl = `${graphUrl}/sites/m365devpractice.sharepoint.com:/sites/CustomApps`;
        const siteResponse = await axios.get(s_graphUrl, {
            headers: { Authorization: `Bearer ${accessToken}` }
        });
        const siteId = siteResponse.data.id;

        // Get List ID
        const l_graphUrl = `${graphUrl}/sites/${siteId}/lists/Documents`;
        const listResponse = await axios.get(l_graphUrl, {
            headers: { Authorization: `Bearer ${accessToken}` }
        });
        const listId = listResponse.data.id;

        // Get List items
        const items_graphUrl = `${graphUrl}/sites/${siteId}/lists/${listId}/items`;
        const itemsResponse = await axios.get(items_graphUrl, {
            headers: { Authorization: `Bearer ${accessToken}` }
        });

        context.res = {
            status: 200,
            body: itemsResponse.data
        };

    } catch (error) {
        context.res = {
            status: 500,
            body: error.message
        };
    }
};
- Below are the values that are required from the Azure App registered in the above step.
- Tenant ID
- Client ID
- Client Secret
- All the above configuration values are taken from local.settings.json file.

- The business logic of the above code is to return the Documents library item count.
- To fetch the list items or item count, we need to retrieve the Site ID, List ID and then the list item count since we are using Graph API
- Finally we are returning the complete list of items as the response to this Azure Function.
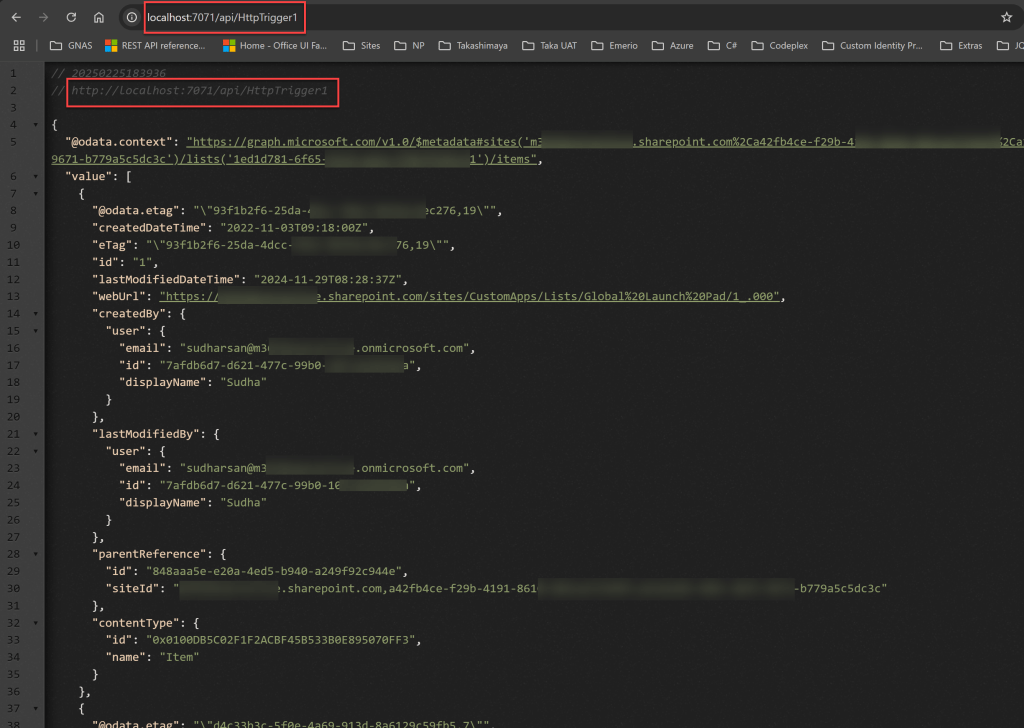
Note: While creating the function, I had configured this function to use Anonymous mode so we without any function key, I can directly browse this URL to get the response. Do not use this approach while deploying to production which will have security impacts.
Make sure, the Host properties are set in the settings file of an azure function to avoid CORS issue. This setting is required when trying to execute the function locally. When deployed to Azure Function App, you will have a CORS setting in the app which you can configure to allow all domains or certain domains alone which is purely based on your requirement.
You can run the azure function and try to browse the URL. You should see some data like the below screenshot.
Call Azure Function in SPFx Web part
Below is the code that will call the azure function to get the data using the elevated permission
const _getListItems = async () => {
        const funcUrl = 'http://localhost:7071/api/HttpTrigger1';
        const response = await props.context.httpClient.get(funcUrl, HttpClient.configurations.v1, {
            headers: {
                "Accept": "application/json",
                "Content-Type": "application/json"
            }
        });
        const listitems = await response.json();
        console.log('list items: ', listitems);
    }
Note: The above code is the actual function that is used to retrieve the data using Azure Function for the users who are restricted to access the information in SharePoint OOB.
Conclussion
Since SPFx runs in the user’s context, elevated permissions cannot be achieved natively. However, by using Azure Functions with App-Only Permissions, you can securely retrieve and manipulate data that the user does not have direct access to.
I hope you had learned something useful regarding the SPFx secured limitation and how to override the limitation in a secured manner without having any impact to the security.
Happy Coding…

Pingback: Elevated Permission in SPFx Webpart Using Power Automate | Knowledge Share
great article. could you please also explain how to securely access these endpoints in SPFx. Lets say if the endpoint is entra id secured, that is only organsiationpeopl can only then how to retrieve the token for that in SPFx.
LikeLike