Introduction
Hi Friends, today let us learn to create a Multitenant application using React and MS Graph API to pull the information from different tenant using our custom Multitenant application. I hope some of you are aware of Multitenant application and many are puzzled and they dont know the actual need for developing the Multitenant application.
What is Multitenant Application?
A multitenant application is just like normal other applications but its intent is to serve multiple tenants, where each tenant is a separate and distinct group of users, services or organizations that share the same application instance but have their own isolated and customized environment within it. Its like renting or subscribing to the application.
Key characteristics of multitenant applications include:
- Shared Infrastructure: Mutltitenant applications typically share a common infrastructure, database and codebase. This will help in optimizing the resources and reducing the overall costs.
- Isolation: Despite sharing the application instance, each tenant’s data, configurations, scopes and permissions are kept separate and isolated from those of other tenants. This ensures data privacy and security.
- Cost Efficiency: It can significantly reduce infrastructure and operational costs since resources are shared amonng multiple tenants. This makes it attractive option for service providers and businesses looking to optimize their IT expenses.
- Ease of Maintenance: Sharing the single codebase simplifies the maintenance and updates. Changes can be applied universally, ensuring consistency and reducing the effort required for updates and bug fixes.
- Enhanced Security: Although tenants share the same infrastructure, proper isolation mechanisms ensure that each tenant’s data is secure and separated from others. This allows for robust security measures while still optimizing the resource usage.
Feature of our Multitenant Application
This sample helps you to learn the following features for Multitenant application
- How to register an app in Azure Entra ID
- Using MSAL authentication library to authenticate work and school accounts across the tenants.
- How to define the API permissions for Graph Endpoints to display the relevant information based on the tenant specific data.
- How to acquire the token and consume Graph API.
Pre-requisites
Below are the pre-requisites required to run this sample application
- 2 different tenants with Admin privilege to register an application
- Permission to create a react application using create-react-app
- VS Code for development
- Permission to download node modules
What is MSAL Library?
This library for javascript enables client-side Javascript applications to authenticate users using Azure AD work and school accounts, Microsoft Person account and social identity providers like Facebook, Google, LinkedIn, Microsoft Accounts etc through Azure B2C service. It also enables the app to get tokens to access Microsoft Cloud services such as Microsoft Graph. The react version of this library uses the OAuth 2.0 Authorization Code Flow with PKCE.
Azure App Registration
Let us see how we can register an app in Azure Entra ID and configure the permissions required for the application to access. Below are the api permissions that must be configured
- User.Read – To read the logged in user information
- User.Read.All – To get all the users in the tenant and we will display the user count in our application.
Since we are going to use 2 tenants, we will try to register the app in 1 and try to use the other like a customer tenant. Navigate to portal.azure.com on one of the tenant and click Microsoft Entra ID and from the Left Navigation choose App Registrations.
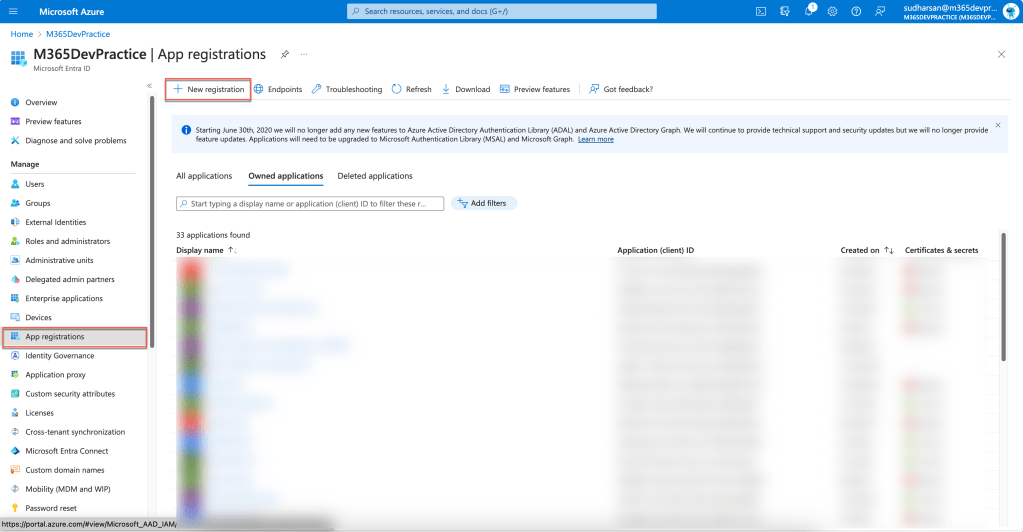
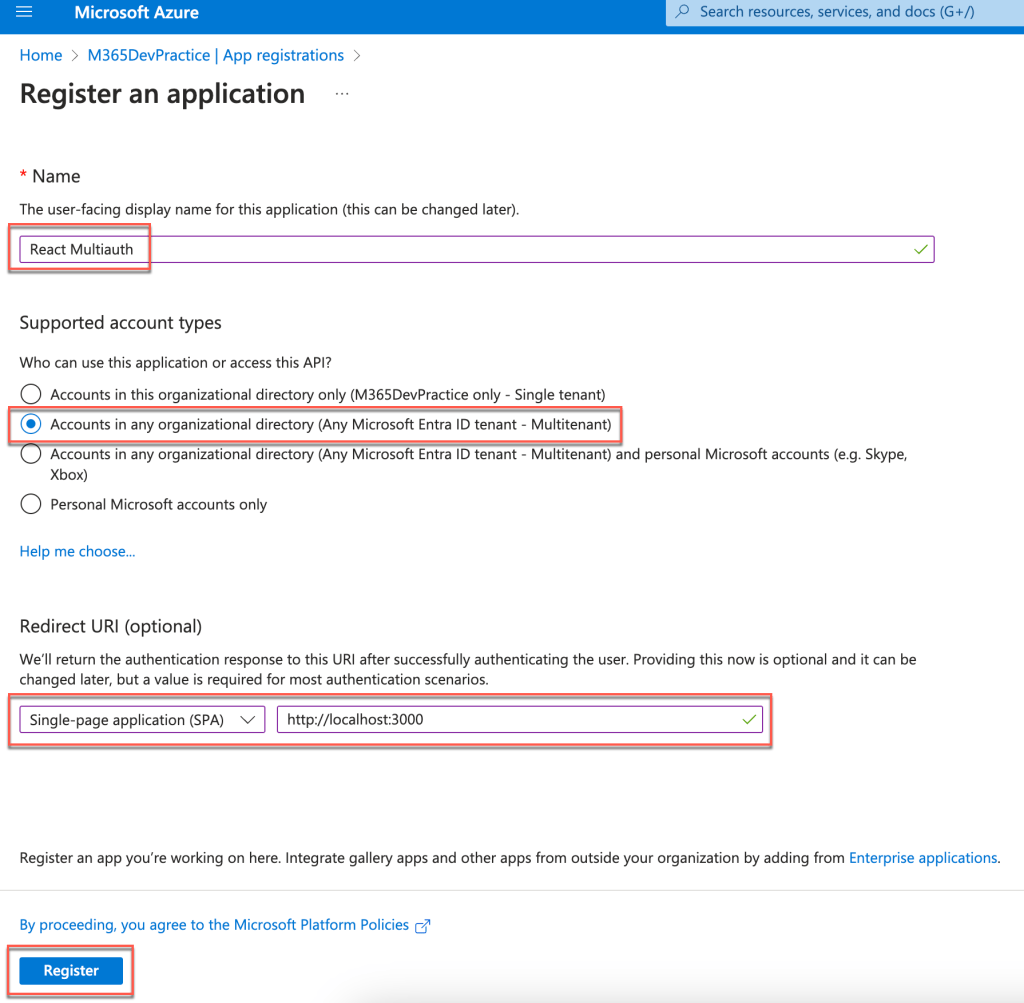
Click New Registration and provide the following details
- Name – Name of the app registered and the same will be displayed to the customer when they access for the first time or change in the permission scope.
- Supported Account Types – Choose Multitenant
- Redirect URI – Choose SPA and give the URI as http://localhost:3000
- Click on the Register button to register the app.
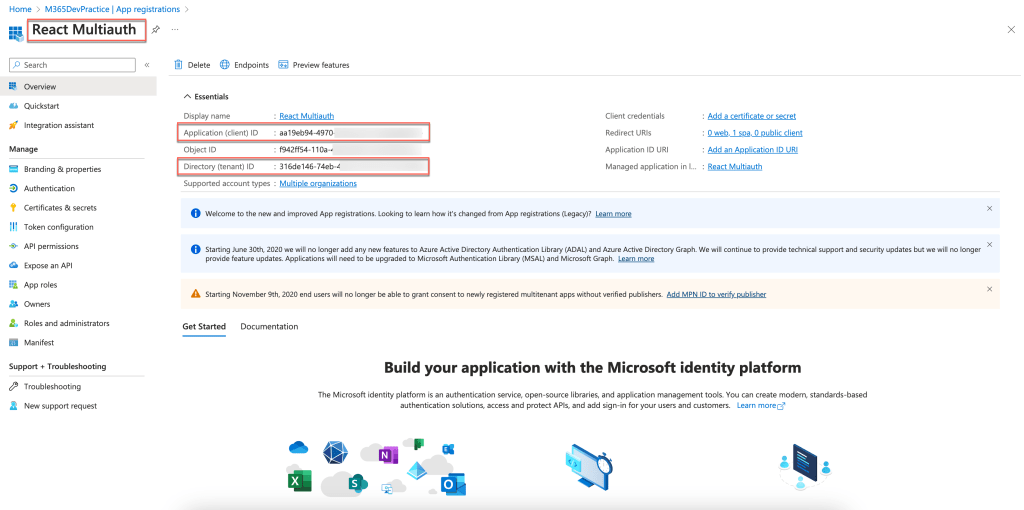
Once the app is registered following are the details that must be configured in the application to enable multitenant.
- Application ID
- Tenant ID
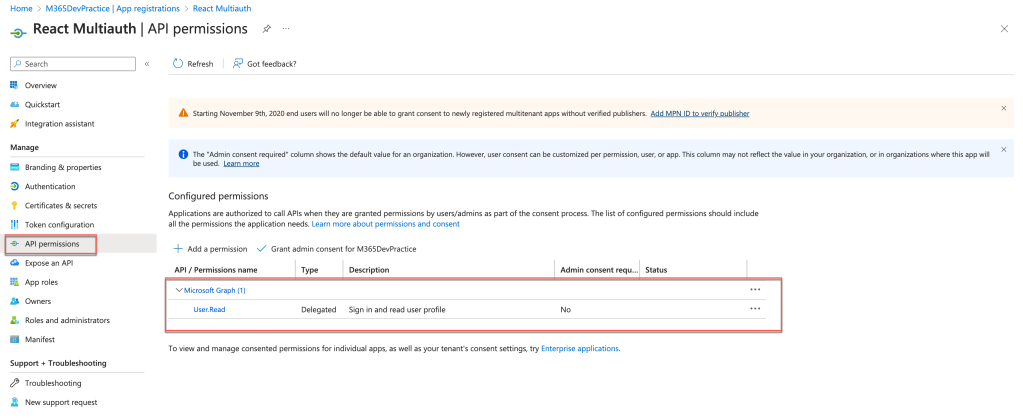
On the left navigation, click on API permissions. By default, User.Read is configured. Using this permission we will be able to retrieve the current user information.
We are ready with the pre-requisites and now we will start developing the application.
Focus on the Code
Create a project using create-react-app and choose the template as typescript. Once the project is created, install the below modules.
- @azure/msal-react
- @azure/msal-browser
MSAL React should be instantiated outside of the component tree to prevent it being re-instantiated on re-renders. After instantiation, pass it as a props to the application. Below is the index.tsx file.
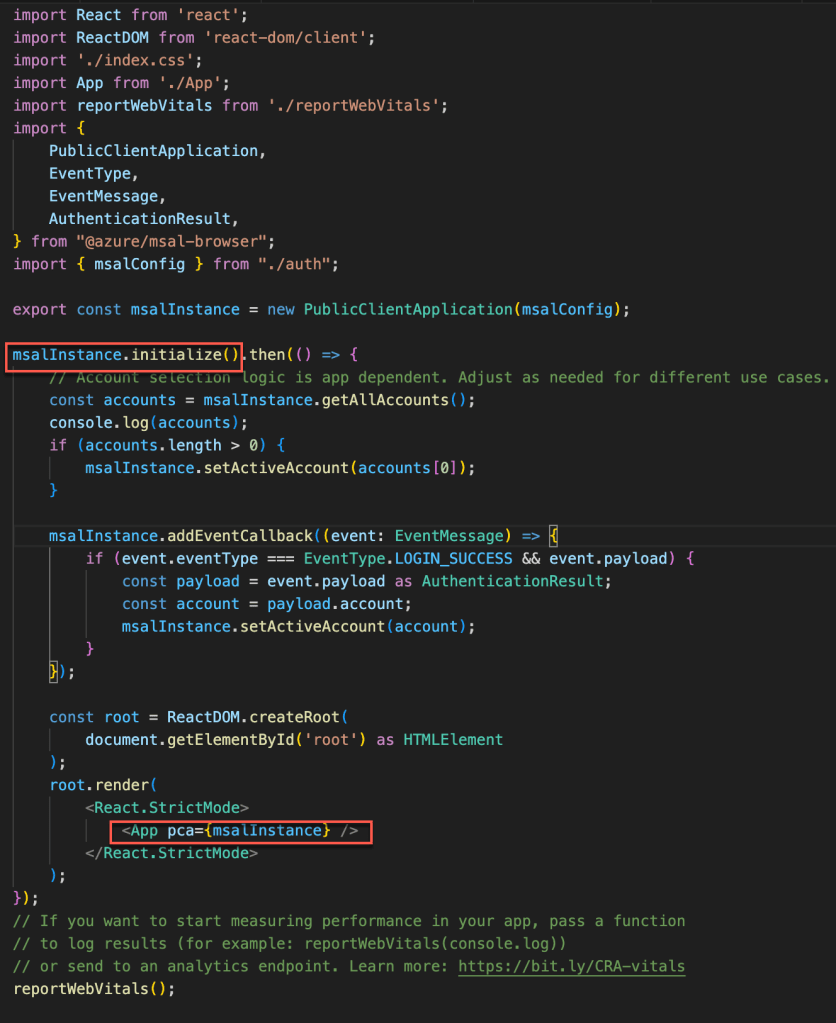
There is a configuration passed to the PublicClientApplication to instantiate the msalInstance and below is the configuration which has the following

- clientId – Application ID stored when the app registered.
- authority – Login authority URL to be redirected if the user is not logged in. The last part of the URL is common which means that this is multitenant and if you are developing for single tenant, you can replace common with tenant ID
- redirectUri – The URL to be redirected once the user is logged in.
- postLogoutRedirectUri – Since we are using the popup method for logging in and out, we have just given the relative url as ‘/’.
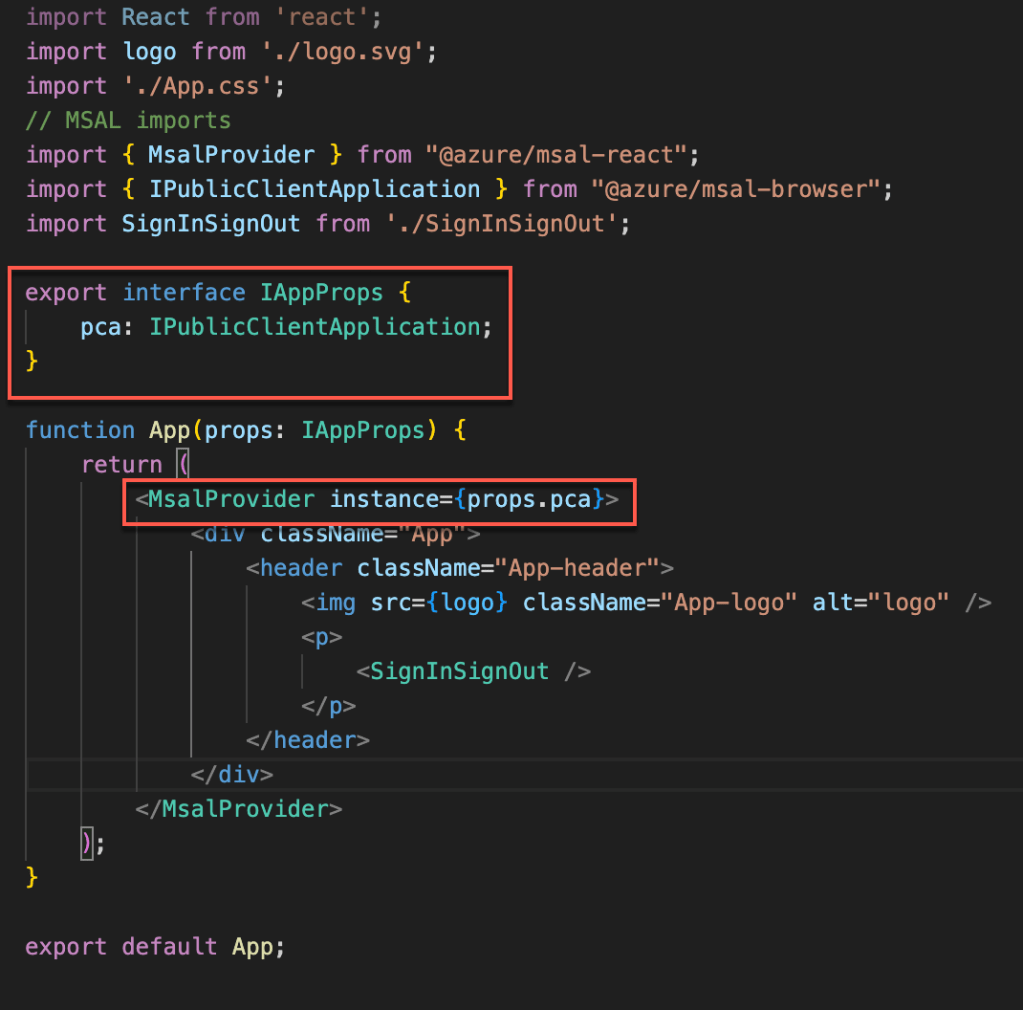
Next is to use the MSALProvider at the top of the component tree which will give us access to the PublicClientApplication instance via context as well as all hooks and components provided by msal-react.
Next is to sign-in. MSAL has multiple options like loginPopup(), loginRedirect(), and ssoSilent() for login. In our application we are going to use loginPopup() method.
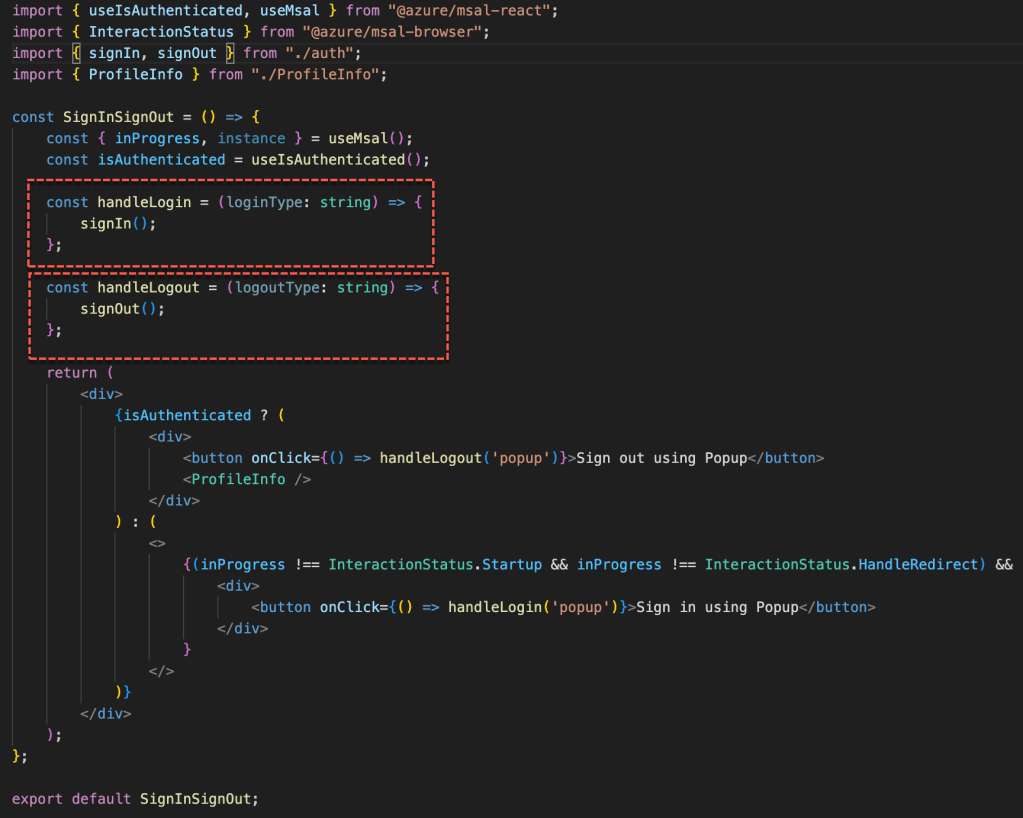
Let us see what we are doing here step by step
- isAuthenticated – This hook variable is provided by MSAL and it returns the boolean whether the user is logged in or not. Using this value, we can set the Signin or Signout button.
- There are 2 methods named handleLogin (to login the user) and handleLogout (to logout the user) declared and it is mapped to the respective button click event.
- The handleLogin and handleLogout will call signIn and signOut method which is defined in the auth.ts along with other methods.

Here we are using the msalInstance which is instantiated in the index file to call the login and logout method. There is one more additional step we are doing to store and remove the logged in user account in the session storage.
Also, if you noticed we are passing the loginRequest param to the loginPopup method which has the required scopes that we will use for the application.


The above are the scopes that will be used in our application. The same will requested to approve or consent on the client or consumer tenant.
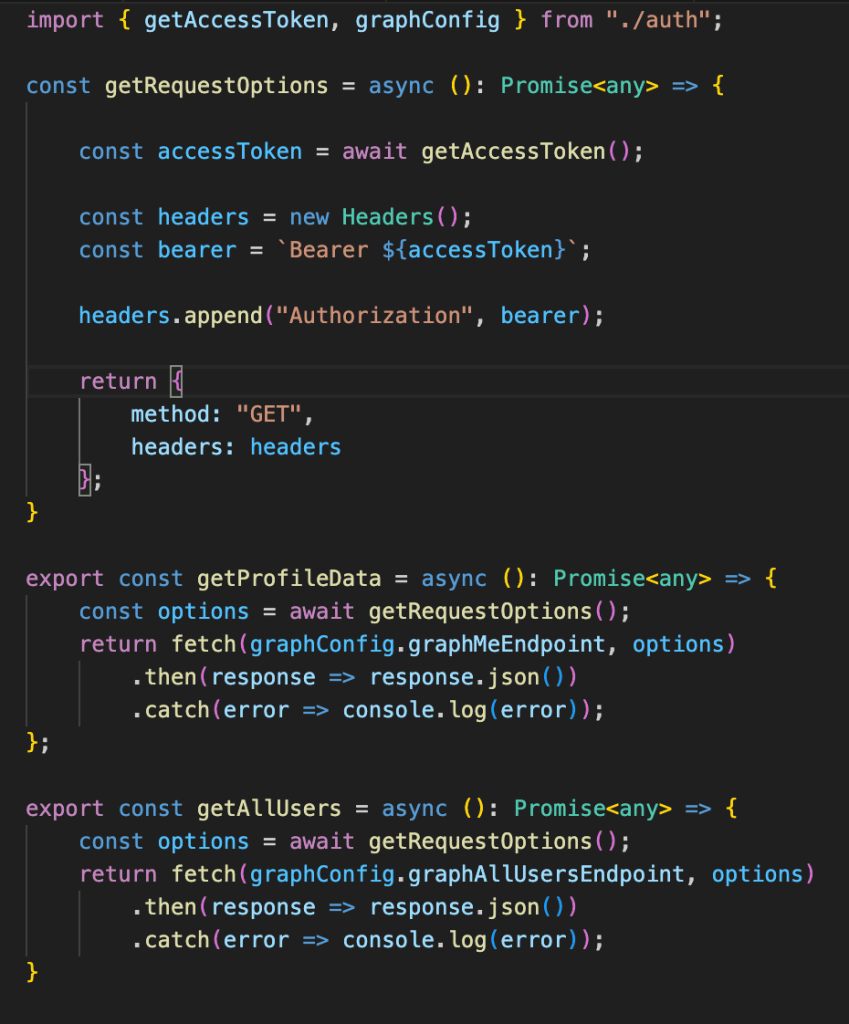
There are few other variables and method declared in the auth.ts file to support the application. Below is the graph endpoint variable to access the information from the graph API.


We need to get the accesstoken to access the graph API. For each and every call to the graph API, we will get the latest accesstoken and use it with the API. If there is a change in the scope which was not authorized then it will throw the popup to get the approval for the modified access.
Below is the code for graphHelper.ts file
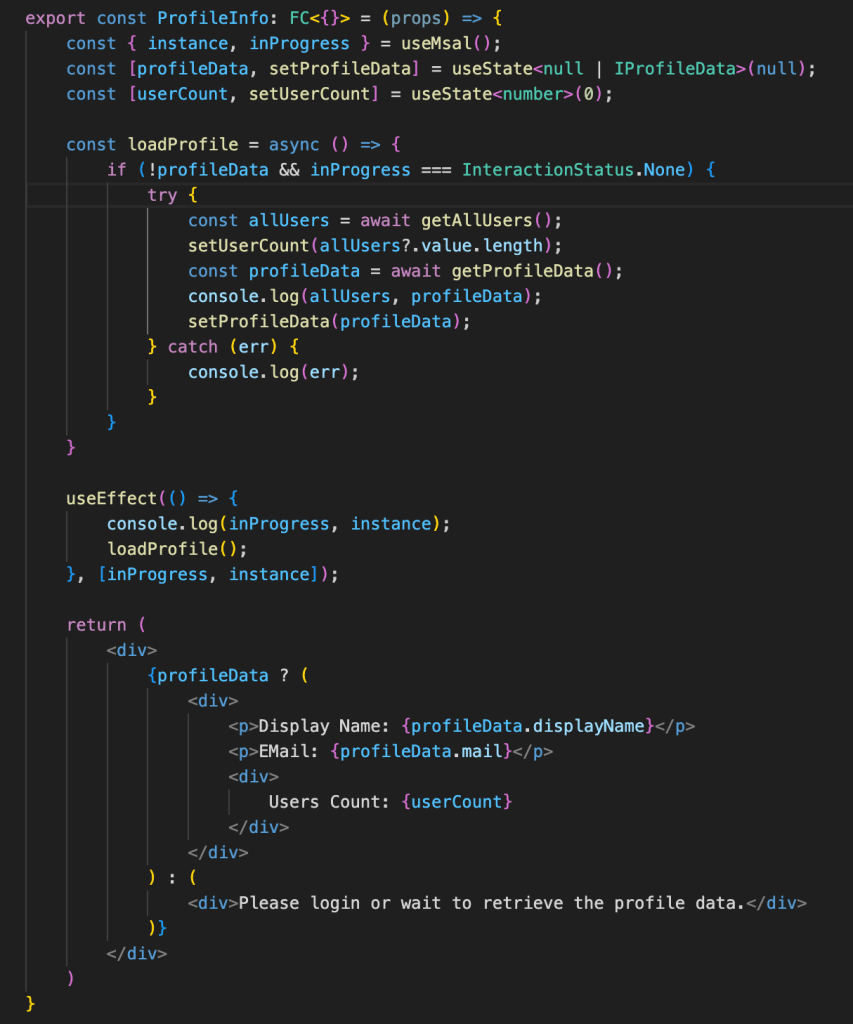
Once the user is successfully logged in, we will show the ProfileInfo which is a small functional component and below is the code.
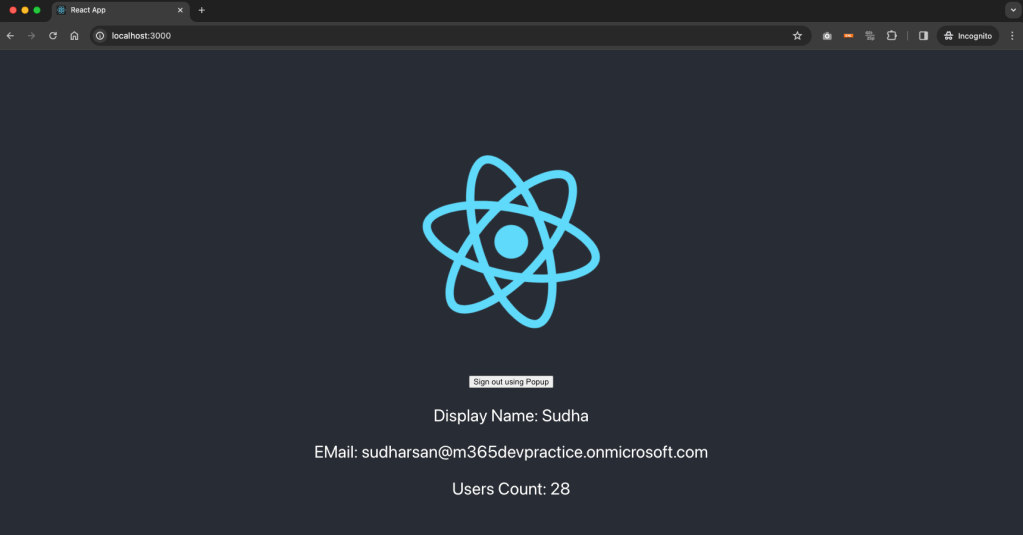
Now our application is ready and when we run the application in our first tenant where we registered the app.

Now we will signin using the tenant where we registered the app.

Based on the list of scopes defined on the application, the permission will be requested to the user. For some of the scopes, you need the tenant administrator to approve or consent for the organization. Once the permission is accepted or consented, below is the information displayed.
When I tried to run the same application in another browser and tried to login with another tenant id, then the below will be displayed.

Once the permissions are accepted, below will be displayed.
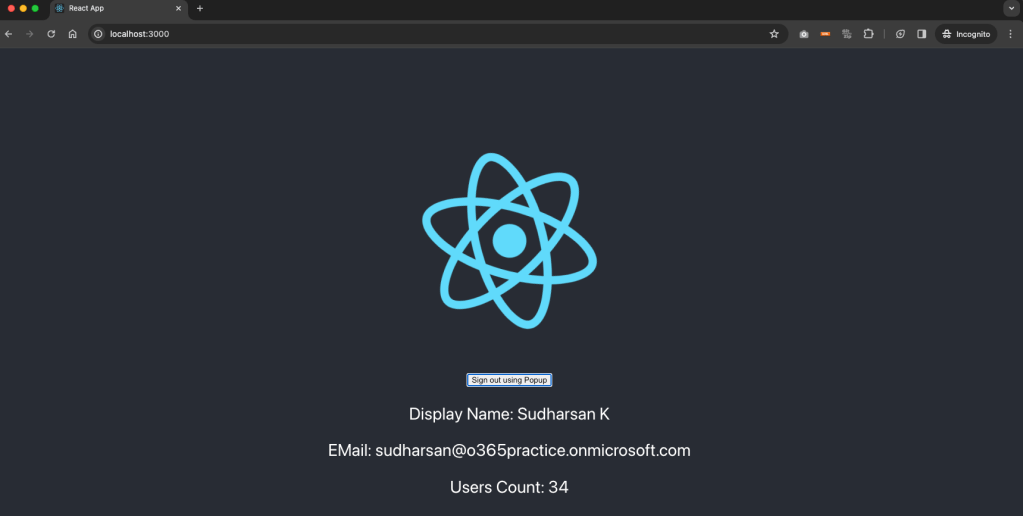
You can see the same application in different tenant with different information. So we have successfully developed a sample multitenant application and its working perfectly with Graph API.
When the app permissions are accepted at the consumer tenant, the app is created as a Enterprise application in the consumer tenant. Please refer the screenshot below.
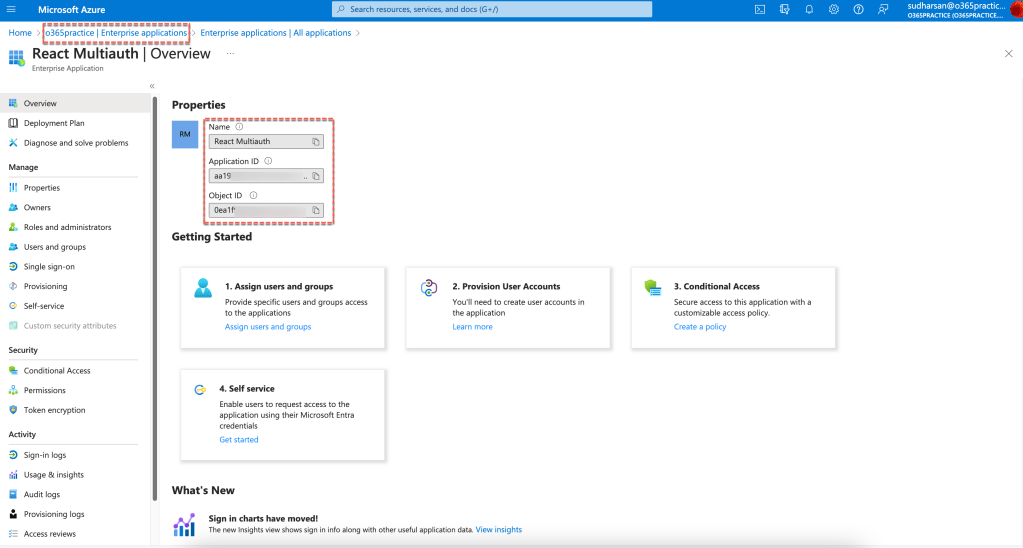
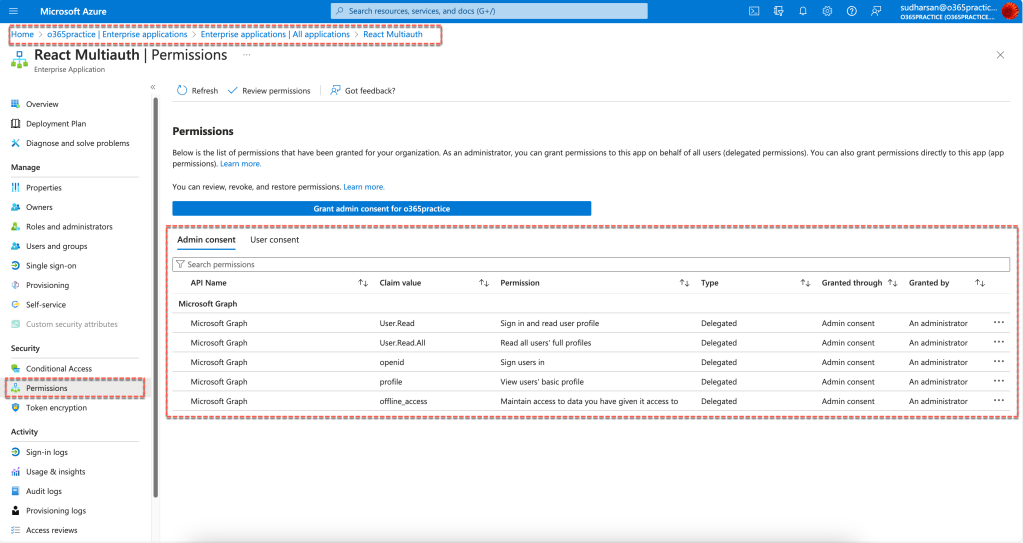
You can see the permissions requested and since it is consented by the Admin its displayed in the Admin Consent tab and if the user accepted, then it can be seen in the User Consent tab. There are other permissions that is also required for OAuth which is mainly for handling authentication and access tokens.
Reference
Conclusion
We came to the end of the blog post and I hope you had learned something about the multitenant application. In future we will try to enhance this application by leveraging more Graph API endpoints and also try to use other providers like Google or Facebook or LinkedIn.
Please let me know your feedbacks or clarifications in the comments section. Also, please support my youtube channel Knowledge Share
Happy Coding…

Pingback: Multitenant Azure Function using MS Graph API | Knowledge Share